


Reverse Shoulder Replacement
The following information is a general overview of the process of a shoulder replacement. We hope you find this informative and educational, as the patient, about the process you are about to undergo. Shoulder Replacement surgery is not a “minor” surgery, and it is our belief the patient should be well educated and welcomed to ask questions. We hope this overview will help ease any anxiety in regards to surgery and serve as a guide to getting all your questions answered before and after surgery.
Remember, the following are only GENERAL guidelines and suggestions. Your surgeon will give you specific instructions that should be followed at all times.
INTRODUCTION
A “Shoulder Replacement” has become a more common procedure over the past 15-20 years. During a shoulder replacement surgery the “worn out” (or broken) parts are replaced with artificial parts, called components or prostheses.
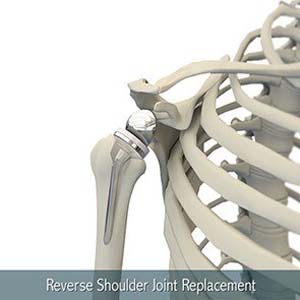
Most of the time the prostheses are designed to match the shape of the area being replaced (called an anatomic replacement), but sometimes the shoulder is damaged in such a way this is not possible. To help patient that are not able to have an “anatomic replacement” , a special prosthesis is use. This prosthesis reverses the shoulder, and is called a REVERSE TOTAL SHOULDER ARTHROPLASTY (RTSA). The reversed parts allow you to use the large muscles around the shoulder and hopefully decrease your pain which increase your function.
THE NORMAL SHOULDER
The normal shoulder is made up of the humeral head (top part of the arm bone) and the glenoid (the socket part of the shoulder blade). In a normal shoulder, the humeral head and glenoid are covered with “articular cartilage” on the surface which allows for smooth gliding of the joint with motion. The cartilage creates the space between the bones seen on X-rays. The rotator cuff muscles connect to the humeral head and assist with motion. These muscles are usually not fully intact or functioning when a RTSA is performed.
THE ARTHRITIC SHOULDER AND NEED FOR A REVERSE TOTAL SHOULDER REPLACEMENT
With normal aging, the cartilage surfaces of all joints wear out. Sometimes this happens to the point there is no cartilage remaining and causes pain, dysfunction, and possibly deformity. Other processes, including rheumatoid arthritis, osteonecrosis, and fractures, can cause this process to be accelerated. As the cartilage thins out, the joint space seen on radiographs decrease to the point of “bone on bone”.
In addition to the shoulder joint’s cartilage being worn out, sometimes the rotator cuff muscles are damaged and cannot be repaired. This causes more limitations and pain. Over time, the humeral head gradually moved out of the socket and is in an elevated position (see pictures below).
For some patients, this process can be functionally limiting and painful, and for others this does not cause too much of an issue. When your pain and function begin to cause a decrease in the “quality of life”, that is when it is time to consider shoulder replacement surgery and discuss it with your physician.
NORMAL SHOULDER XRAY SHOULDER XRAY WITH ELEVATED HUMERAL HEAD
SHOULDER REPLACEMENT OPTIONS
There are three types of shoulder replacement.
- Hemiarthroplasty (partial shoulder replacement): with this procedure only the humeral head is replaced. This is commonly done for younger patients, and to treat fractures of the shoulder.
- Total Shoulder Arthroplasty (total shoulder replacement):with this procedure BOTH the humeral head and the glenoid (socket) are replaced. This type of replacement are beyond the
scope of this handout. Your physician will give you a different handout if this prosthesis is an option for you.
- Reverse Shoulder Arthroplasty (“reverse” arthroplasty):with this procedure the humeral head and socket are replaced, but reversed.
THE SURGERY
During surgery, your surgeon will expose your shoulder very carefully. After the exposure, the humeral head is removed, and the humerus (arm bone) is hollowed out to allow the prosthesis to fit inside your arm bone. The humeral component is made out of metal and contains a “socket”. The original bony socket is then smoothed out and a plate with screws is put on the socket, and a metal ball is then attached to the new socket. This is how the shoulder is “reversed”. (see picture below)
Your skin incision is then sewn closed and a sterile dressing is placed. A shoulder immobilizer is applied and you are awoken from anesthesia and taken to the Recovery Room.
Reverse Shoulder Arthroplasty: a socket is placed where the ball used to be, and a new ball is attached to the old socket
LENGTH OF SURGERY
The surgery usually lasts between 1 and 3 hours. This is a common question we are asked but every shoulder is different and your surgeon will take as long as needed to complete the surgery. The surgical nurse should keep your family informed of our overall progress during the surgery. Once the surgery is completed, your surgeon will find your family and discuss with them the outcome of the surgery.
SUBSCAPULARIS HEALING
The subscapularis muscle is one of your very important rotator cuff tendons which allows you to move your shoulder. This muscle is the “door” to the shoulder during surgery. If this muscle is still intact it must be carefully released for your surgery to be performed. This tendon is very meticulously repaired at the end of surgery.
An example of a postop shoulder immobilizer
For your shoulder to function properly after surgery it is VERY IMPORTANT that the repaired subscapularis muscle heal. This is why you are placed in an immobilizer and gentle protective exercises are the only exercises allowed after surgery. It takes 6 weeks (or longer) for your tendon to heal before it can be “tested”.
It has been shown smoking and uncontrolled diabetes can delay or inhibit healing. It is HIGHLY encouraged to stop smoking and control your blood sugars before AND after surgey.
RISKS OF SHOULDER REPLACEMENT SURGERY
As with anything, there are risks. Your surgeon will take precautions to attempt to prevent complications, but one still may occur.
- Infection
- Wound complications
- Dislocation
- Stiffness
- Fracture (broken bone)
- Weakness
- Blood Vessel or Nerve injury
- Continued pain
- Tendon not healing
- Component failure
**This is not a complete list of possible complications, but does list the some of the most common complications**
In addition, the prosthesis may come loose in the future and may need to be revised. Loosening can be caused by wear and tear on the prosthesis, or from a traumatic injury (ie: fall, car accident). This is most likely not due to your initial surgery.
PREPARING FOR YOUR SURGERY
There is a lot that both your surgeon, their office, and you need to complete prior to your surgery. All of this is done with your safety as the primary goal!
One of the main requirements, is all patients receive a medical evaluation by their primary care physician. In addition, you will have to have a blood draw to ensure your lab work is adequate. Your doctors’ office will assist you in scheduling your “clearance” appointments and lab work prior to surgery.
Before surgery we ask, in assistance/guidance with your primary care physician (or other specialist), certain medications be changed or stopped. These medications include (but are not limited to):
- Blood thinning medications: warfarin (Coumadin), clopidogrel (Plavix), Cilostazol (Pletal), Dabigatran (Pradaxa), Rivaroxaban (Xarelto), heparin, enoxaparin (lovenox), dalteparin (fragmin), fondaparinux (arixtra), asprin (asprin containing products), Aggrenox, Nonsteroidal Anti-inflammatory medications (NSAIDS), etc
- Rheumatoid Arthritis: minocycline, sulfasalazine, methotrexate, azathioprine, Imuran, chlorambucil, leflunomide, cellcept, etc
Your primary care provider who manages these medications will help you decide when to stop and restart these medications in regards to your surgical date.
A list of medications will be given to you as a reminder.
If you have diabetes: Before your procedure, the physician who manages your diabetic medication should be contacted and asked for specific instructions on adjusting, or stopping, your insulin or other diabetic medications for surgery.
If you develop an infection before surgery: If you develop an infection on any area of your body prior to surgery, please seek medical attention from your PCP as soon as possible. Please notify your surgeon as soon as possible also. Your surgery may be rescheduled to allow your infection to resolve completely.
This will help prevent an infection in your shoulder after surgery.
Find a “caregiver” to go with you: Find someone who will be able to take you to the hospital and can wait in the surgical waiting room for you during surgery. This person is usually a family member, spouse, friend or other loved one. They will not need to stay overnight in the hospital with you.
PREPARING FOR YOUR RECOVERY
Most patients return to their own home after shoulder surgery. Usually a “caregiver” is around during the day to assist with the needs of the patient.
Below are some things to think about, starting several weeks before surgery, to help with a comfortable transition home:
- Clean your home a week before surgery as it will be difficult to do so afterwards
- Remove clutter and loose rugs from the walkways to prevent falls
- Rearrange your bedroom (and other rooms) to allow extra room to maneuver as you will only have the use of one arm
Related Topics
- Anatomic Shoulder Joint Replacement
- Reverse Shoulder Replacement
- Revision Shoulder Replacement
- Shoulder Fracture
- Shoulder Arthroscopy
- Rotator Cuff Repair
- Instability Repair: Shoulder Labrum Reconstruction
- Distal Clavicle Excision
- Subacromial Decompression
- Scapula Fractures / ORIF
- Clavicle Fractures / ORIF
- AC Joint Injury Reconstruction
- SC Joint Injury Reconstruction
- Biceps Tenodesis/Tenotomy
- Pectorlis Major Tears Repair